Friday, May 10, 2013
How to Repair an Air Mass Sensor in the Engine of a Mercedes
1. Open the hood of your Mercedes and locate the mass air flow (MAF) sensor, mostly found between the air cleaner box and the air intake pipe of more modernized engines.
2. Unfasten all of the clamps that hold the air filter box to the intake hose and disconnect completely. Remove the air filter inside and thoroughly clean this area of any dirt that may have built-up over the extensive use of your Mercedes. This step is not imperative to removing and replacing the MAF sensor, but it will certainly help improve the functionality of the new sensor once installed. Replace the air filter if necessary, but leave the air box disconnected at this time.
3. Use the necessary socket to remove the bolt that holds the clamp of the air intake pipe. Remove this piece to free the intake pipe.
4. Pinch both sides of the MAF sensor and wiggle free until you have completely removed this part from the engine. Be patient, as this may take a few moments of your time to loosen.
5. Compare the old MAF sensor that you just removed with its replacement counterpart. Make sure both sensors match identically and replace the new MAF sensor exactly as the new one was removed. It should slide on very easily, with little wiggling to set into place.
6. Reconnect all of the parts that were removed to access the MAF sensor and clean the air filter box. Make sure all bolts are tightened properly to hold the intended clamps together, ensuring that the air intake tube and air filter box both are set exactly as they were before removal and installation of the MAF sensor.

Sunday, May 5, 2013
How to Replace the Oil Pan on a Mercedes 190e
1. Lift the front of the Mercedes 190e with a floor jack and place jack stands under the front axle on both sides of the car, then lower the vehicle to rest on the jack stands.
2. Locate where the exhaust pipe attaches to the engine and detach the pipe from the motor, using a socket wrench to unfasten the bolts.
3. Remove the air filter canister by undoing the bolt on the top with a socket wrench and taking the canister off the top of the engine.
4. Disconnect the linkage to the carburetor with a pair of pliers and move the linkage out of the way.
5. Unfasten the motor mounts of the engine, using a socket wrench to remove the bolts, then lift the engine up with a floor jack about 4 inches.
6. Place two wood blocks between the engine and the vehicle frame to hold the engine in place then lower the floor jack away from the engine.
7. Locate the oil pan drain plug on the bottom of the oil pan and place a drip pan underneath the drain plug.
8. Loosen the drain plug with a socket wrench and allow the oil to drain into the pan until it is completely empty.
9. Move the drain pan out of the way and unfasten the bolts on the oil pan with a socket wrench.
10. Pry the oil pan from the engine block with a screwdriver, moving the oil pan out from under the engine then use a putty knife to scrape off any excess gasket material from under the engine.
11. Place the new oil pan gasket on the lip of the new oil pan and slide the pan into position, attaching it with bolts to the bottom of the engine.
12. Lift the engine up with the floor jack, remove the wood blocks then lower the engine back into position over the engine mounts.
13. Secure the engine to the engine mounts, using a socket wrench to tighten the nuts then reattach the carburetor linkage.
14. Secure the air filter canister back into place and reattach the exhaust pipe to the engine.
15. Raise the vehicle up off the jack stands and remove the stands, lowering the car back onto the ground.
16. Locate the oil cap on the top of the intake manifold and take the cap off.
17. Fill the engine with five quarts of oil then place the cap back on the intake manifold.
Saturday, May 4, 2013
How to DIY Troubleshoot a Mercedes
1. Inspect the paintwork for damage. Scratches, dents and corrosion can all be indicative of greater damage elsewhere. Any scratch on the paint can be expensive, because Mercedes often used limited run paints (restricted to certain cars and years of manufacture). Paint needs to be repaired soon, as it can lead to early rust. Any dents in the body panel could mean that the Mercedes was in an accident and could have frame damage underneath. If there is corrosion in the panel then it is guaranteed that there is rust elsewhere, especially on the undercarriage.
2. Open the hood and inspect the engine. There should be no debris in the engine bay or radiator. If your Mercedes is a carbureted model, then inspect the barrel intakes for damage to the valves. Damaged carburetor valves can lead to irregular air-fuel mixes that can damage your piston or sleeves. If your engine is fuel injected, then inspect the fuel lines for leaks (pay special attention to the rubber hoses, as they have a tendency to become brittle with age). Inspect the power lines on the hybrid model for any damage (do not touch damaged ones). Call a Mercedes dealership to repair a hybrid model.
3. Turn the car on and listen to it idle. The hybrid Mercedes should not run the engine while the car is sitting still, only when under power. Non-hybrids should idle around 2000 rpm (if it idles higher than this, there may be a problem with the fuel-air mix). Watch the engine temperature. Even on a hot day, the engine should remain cool in idle.
4. Drive the Mercedes forward and listen for the engine. AMG models should roar when the throttle is pushed in, even at sedate speeds. Non-AMG models should be whisper quiet, even at highway speeds (if you hear the engine, then some of the noise isolation material has fallen off). Mercedes prides itself on providing quiet interiors on their regular cars. The car should easily absorb any bumps in the road. If the car rocks a lot then the shocks may be shot.
How to Remove the Rear Seat in a Mercedes W123
1. Remove the bolts that secure the seat base to the floor pan with a socket and ratchet. The bolts are between the center cut-out in the seat where the seat belt fasteners come out of the center of the seat. Remove the bolts with a socket and ratchet.
2. Grab the front of the seat and work your fingers between the floor pan and the bottom of the seat. Pull up to force the clamps out of the floor pan and pull the seat forward to separate it from the seat back.
3. Push the seat belt fasteners from between the two seat panels and remove the lower seat from the Mercedes.
4. Grab the bottom of the seat back where the seat was joined with the seat base. Pull out on the bottom of the seat to remove the clips from the trunk frame. Keep pulling until the entire seat is free from the trunk frame and remove the seat back from the Mercedes.
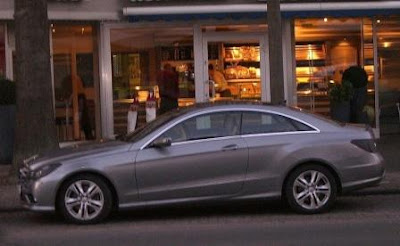
Mercedes E class Coupe and Convertible facelift
Shortly after the saloon and Estate with this front were presented, it is now the turn of the coupe and convertible versions.
As with the E-Class sedan and Estate disappear in the Coupe and Convertible dual headlights. Interestingly, the flared rear fenders still present in the latter, while the style element to the sedan and station wagon correctly deleted.
Turbo
The motor news is largely similar to that of the already revealed body styles. The range starts so now with the E 200 with 184 bhp four-cylinder turbo engine and extends to the E 500 with 408 hp V8.
The new E 400 with 333 bhp BlueDIRECT V6 used in the sedan and estate was introduced, finds his way to the more desirable E-classes. Blue Direct is a package of measures allowing the engines ready for the Euro 6 standard, which by 2015 will apply.
There will also be a new four-cylinder with this technology, which is also ready for the + Euro 6 standard. There is a choice of three diesel engines with outputs ranging from 170 to 265 hp.
Safety
In security protects Mercedes under the name Intelligent Drive with a whole range of new safety systems.
Think of collision avoidance, pedestrian detection and even a system that a driver behind you by flashing warning lights independently to stop trying to moons. If not, then the system ensures that the occupants minimize suffering, for example through the belts to attract.
Standard Agility Control
All Coupes and Convertible s get standard Agility Control with adjustable dampers for better handling. Naturally, there also your heart ticking on the option list. Think of an automatic windshield under the name AIRCAP. Above 40 km / h slides off automatically, you below 15 km / h then it automatically goes back down.
The now familiar AIRSCARF is reflected. For those who wish, the Coupe and Convertible almost unlimited personalizing said Mercedes. The exact costs we hear soon, in May, the E-Class Coupe and Convertible in the showroom.
How to Reset the FSS Message for a Mercedes
1. Turn on the car so the engine is running.
2. Locate the R or Reset button to the left of your instrument panel. Press the reset button twice. In the display screen in your instrument panel, you should see the amount of time left before your next oil change.
3. Turn off the car.
4. Hold the reset button down and simultaneously turn on the engine again. Hold the button down until the display screen beeps. You will see the FSS light reset.
Friday, May 3, 2013
2013 Mercedes ML 500 4MATIC BlueEFFICIENCY

Mercedes-Benz has recently introduced the new ML 500 4MATIC BlueEFFICIENCY.
The new ML 500 features ON&OFFROAD package. It has six driving modes, which optimize the driving dynamics and handling safety of the vehicle and deliver optimum drive system control. In particular, the driver can select from one automatic mode, two special off-road modes and three on-road modes using a rotary control in the centre console.
The ML500 is 125 horsepower weaker than the ML63 AMG, and roughly a second slower to 100 km/h, but then it’s 30 grand cheaper and will be more fuel efficient as well. It doesn’t get any sort of body kit or big fancy wheels though. It looks pretty much like the ML350.
Mercedes Benz has added the ML 500 4MATIC BlueEFFICIENCY variant to the M-class line-up. The new M-class, which went on sale in the global market last year, currently comprises of the ML 250 and the ML 350 diesels and the ML 350 and ML63 AMG petrol versions. The ML 350 CDI was also launched in India a little while back and has been a hot-seller so far.
The new ML 500 4MATIC BlueEFFICIENCY will be arriving at dealerships in autumn this year. First, the new turbocharged BlueDIRECT V8 of this Mercedes-Benz SUV model is a direct injection petrol engine.


Press Release
New model year with ML 500 4MATIC BlueEFFICIENCY: More performance, more equipment
The third generation of the M-Class was launched in September 2011 and, in common with its predecessors, it has had an enduring impact on the SUV sector. An additional V8 petrol version now joins the range in the shape of the ML 500 4MATIC BlueEFFICIENCY. The equipment package is also further enhanced by new safety features such as COLLISION PREVENTION ASSIST (CPA)*. The new ML 500 4MATIC BlueEFFICIENCY can be ordered from 22 June and will be arriving at dealerships in autumn 2012.
The new ML 500 4MATIC BlueEFFICIENCY, which features a turbocharged BlueDIRECT V8 direct injection petrol engine, offers outstanding performance along with top-class efficiency. The new model outperforms fuel consumption figures of its predecessor by 16 percent - while simultaneously boosting performance. The V8 engine develops increased output from a significantly smaller displacement (4663 rather than 5461 cc): the ML 500 4MATIC BlueEFFICIENCY now generates 300 kW (408 hp) instead of 285 kW (388 hp). Torque has been increased from 530 to 600 Nm and is available at a much lower engine speed of 1600 rpm.
The high output despite reduced displacement is achieved mainly by the use of two exhaust gas turbochargers - one for each bank of cylinders. Other innovations of the new V8 engine include a further developed, third-generation direct fuel injection system with spray-guided combustion and piezo injectors combined with multi-spark ignition. The outstanding fuel economy is underpinned not only by the V8 models state-of-the-art engine technology, but also by a comprehensive package of BlueEFFICIENCY measures. In addition to the ECO start/stop function which comes as standard, these measures include the seven-speed 7G-TRONIC PLUS automatic transmission.
Low-friction axle drives, electric steering, optimised belt drive and on-demand control of the ancillary components also play their part in reducing fuel consumption. Below is a summary of key data for all M-Class models:
New equipment features make the M-Class even more attractive
All models from model year 2013 impress with new equipment details. Active safety is further enhanced with the inclusion of COLLISION PREVENTION ASSIST (CPA)* with adaptive Brake Assist as standard. Guaranteeing a secure footing are the elegant 5-twin-spoke 48.3 cm (19") alloy wheels, included in the ML 500 4MATIC BlueEFFICIENCY delivery package, or the all-new 5-spoke 53.3 cm (21") alloy wheels from Mercedes-Benz Accessories. The colour chart offers two gleaming new paint finishes: cavansite blue and cinnabar red. For those seeking an even more enjoyable driving experience in urban traffic, the M-Class is optionally available with Active Parking Assist. This electronic co-pilot automatically seeks out a suitable parking space and takes over steering duties during the parking process. A further option to optimise operational comfort is the electric servo-locking mechanism, which automatically closes all doors and the boot lid.
The optional multicontour seats for driver and front passenger offer maximum comfort with new massage functions, fine-tuning via the COMAND system and luxury head restraints and seat cushion depth adjustment. When the interior becomes excessively warm - for example after a long period parked in hot sunshine - reverse flow seat cooling shortens the cooling period by first drawing air out of the seat before pumping it back in.
As of the new model year, the cockpit TFT display between the two instrument dials boasts an almost photorealistic image; in keeping with the COMAND screen it adopts the modernised display concept of a silver-grey colour scheme. With the internet-capable COMAND Online infotainment system on board, the delivery package additionally features the Mercedes-Benz automatic emergency call system. In the event of a serious accident, the system notifies emergency services automatically and within minutes transmits detailed information about the exact location of the accident and the vehicle model involved.
Mercedes-Benz optionally offers the M-Class with a sound system by renowned audio specialists Bang & Olufsen. The Bang & Olufsen BeoSound AMG high-end surround sound system, with a combined 1200 watt output and 14 high-end speakers, transforms the vehicle interior into a concert hall with breathtaking acoustics.
Various equipment packages are available for those seeking an even more exclusive look for their M-Class. For an enhanced dynamic appearance, for example, there is the AMG Exterior Sports package, featuring special body-coloured front apron, rear apron and side skirts, in addition to 48.3 cm(19") 5-spoke high-sheen AMG alloy wheels. The luxurious designo Exclusive package in black, maroon or porcelain adds new class to the interior. This feature includes seats, instrument display, door centre panels, door arm rests, beltlines and centre console upholstered in nappa leather, in addition to the designo roof lining in black DINAMICA microfibre.
Increased possibilities with optional vehicle dynamics systems
The ON&OFFROAD package for the M-Class has six driving modes for optimising driving dynamics and handling safety, as the optimum drive system control is provided for an extremely wide range of on-road and off-road operating conditions. The driver can select from one automatic mode, two special off-road modes and three on-road modes using a rotary control in the centre console. In terms of "hardware", the ON&OFFROAD package comprises an underguard, a two-stage transfer case with reduction gear, an inter-axle differential lock and enhanced AIRMATIC functionality that allows a maximum ground clearance of 285 millimetres as well as a fording depth of 600 millimetres. With the lighting package featuring the Intelligent Light System onboard, the M-Class driver will also benefit from a lighting system specifically optimised for off-road use.
Active roll stabilisation in the form of the ACTIVE CURVE SYSTEM can be optionally combined with both the AIRMATIC air suspension with Adaptive Damping System (ADS) (standard in the ML 500 4MATIC BlueEFFICIENCY) and the ON&OFFROAD package. This system uses active anti-roll bars on the front and rear axles and compensates for the roll angle of the body through bends, increasing agility and driving pleasure in the process. The system has the additional effect of increasing handing stability and therefore safety, particularly at higher speeds. Further benefits of the ACTIVE CURVE SYSTEM include even greater ride comfort both when cornering and driving in a straight line, together with enhanced off-road abilities.
Outstanding million-seller from €55,394.50
With sales of over 1.2 million vehicles, the M-Class is the most successful Mercedes-Benz SUV. At its world premiere in 1997, the M-Class was considered the precursor of all modern premium SUVs. The third generation was presented in 2011; like its predecessors, it achieved outstanding results in a wide range of polls and rankings. In its debut year the M-Class was awarded the golden steering wheel. TÜV Süd recognised the vehicles high environmental compatibility and awarded the M-Class its coveted environmental certificate. The SUV passed crash tests in line with European NCAP procedures, achieving the maximum five-star rating for outstanding passenger protection.
Latest successes from 2012: With NEDC fuel consumption figures of just 6.0 l/100 km, the efficiency champion ML 250 BlueTEC 4MATIC was voted most eco-friendly car in its class by the "ÖkoTrend" institute. Moreover, the trade journal AUTO TEST named the premium SUV its "Winner in Green". In March, the readers of Europes leading 4x4 magazine Auto Bild Allrad voted the Mercedes-Benz M-Class "Car of the Year 2012".
How to Use My Phone With My Mercedes
Blue-Tooth Technology
1. Determine whether or not your cell phone has blue-tooth capabilities. You can find out by asking the sales representative or looking in the owners manual. Turn your blue-tooth function on, by following the specific directions for your particular cell phone.
2. Verify your particular Mercedes has blue-tooth, by contacting your local Mercedes dealer. Not all Mercedes models have blue-tooth technology. Depending on the year, model and trim level you may or may not have this feature.
3. Turn your Mercedes blue-tooth technology on, if you have this feature. Both the cell phone and vehicle will connect together at this time. All calls will go through the speakers of your Mercedes. If you are listening to music and the phone begins to ring, the music will subside, and you will hear the ringing through the speakers. Once you answer the phone, you will be able to talk hands-free.
Auxiliary Connection
4. Verify your particular Mercedes has an auxiliary port. Most of the time the auxiliary port is marked as AUX and is located near the stereo controls. Again, not all Mercedes models come with this feature.
5. Purchase an auxiliary cable compatible with your particular phone. For example, if you have an iPhone, ask the sales representative to show you the cable which allows you to link your phone into the AUX port in your Mercedes. These cables are usually around $15 at stores such as Best Buy.
6. Insert one end of the AUX cable into the phone and the other end into the AUX port in your Mercedes. Once the phone is connected, you will be able to make calls as usual but talk hands-free and listen to music from your phone through your car stereo. According to Naked Cell Phone, using an auxiliary cable provides static-free sound because of the direct cord connection to your stereo, providing the best sound quality.
How to Compare Cheapest Price for Mercedes 180 Used Car
1. Visit car dealers in your area. There might be Mercedes 180 in local car shops or they can give you referrals on where to buy the cheapest Mercedes 180 possible. Besides pre-owned cars, there are sellers who are open to car trading or car trading with cash.
2. Search online. There are many car sellers in the Internet; Compile a list of websites and compare different Mercedes 180 prices and conditions. Aside from the price, other things need to be considered in buying a car such as the engine and transmission, body type, color, mileage and year made. BuyYourCar and Used Car Quote are examples of websites that can give you good referrals on where to buy a Mercedes 180 used car. Have a few websites as resources and check the credentials of the seller and avoid sellers who dont post photographs of their products on their websites.
3. Contact your preferred car seller. Understand the conditions of the seller before making any negotiations, and ask for the most current high-resolution photographs of the car. The photographs should include exterior and interior shots, and some of them must be close-up shots. You can also ask for a video of a test run to help you decide further.
4. Test drive the car before buying. Make time to test drive the Mercedes 180 on different terrains to get the feel of the car.
How to Crank a Diesel Mercedes
1. Open the door and enter the Mercedes. Insert the key into the ignition cylinder and turn the key to the ON position.
2. Wait for the glow plug indicator on the instrument panel to go out. The glow plugs help pre-heat the cylinders prior to starting the engine. When the glow plug indicator is no longer present, turn the key to the START position and crank the Mercedes.
3. Release the key and allow it to fall back to the ON position. Repeat the process if the Mercedes does not crank the first time. To turn the Mercedes off, turn the key to the OFF position and remove it from the ignition cylinder.
Thursday, May 2, 2013
How to Remove the Mirror From a Mercedes Benz 450
1. Park the car in a sunny spot. Try to park the car in an area where the internal temperature of the car reaches above 75 degrees. If you are working in the winter, you can use a small heat gun or hair dryer to warm the adhesive that holds the mirror in place. Allow the Mercedes to sit in the sun for at least two hours.
2. Locate the area where the mirror attaches to the button glued to the windshield. A small screw holds the mirror on this button. Unscrew the screw and set it aside.
3. Remove any electronic wires attached to the mirror by pulling the wires gently with pliers. These wires control the thermometer inside the mirror, the auto dim feature and sometimes a heating mechanism. Your mirror may have some or all of these features, depending on the features included on your Mercedes 450.
4. Turn the mirror gently clockwise to loosen it from the button on the windshield. Set the mirror down in a safe place where it will not get broken, scratched or sat on.
5. Grasp the sides of the button with a crescent wrench. Gently twist the button in a clockwise direction until the button pops off of the glass surface. If this does not work, insert a razor blade between the glass and the button and apply gentle pressure to pop the button off of the glass.
6. Place a small amount of adhesive remover onto any glue remaining on the surface of the glass. Allow the remover to sit for 10 minutes. Then wipe the residue away with a soft cloth. You can also use the razor blade to scrape away the adhesive.
Instructions for Changing Mercedes C240 Shocks amp Struts
Remove and Replace Rear Shock Absorbers
1. Place the jack under one side of the car and lift it until the rear wheel is clear of the ground. Place one jack stand under the frame near the jack and carefully lower the car onto it. Pull the jack out from under the side of the car.
2. Place the wheel chocks under the opposite front wheel, in front and behind. Open the trunk.
3. Place the jack under the rear axle member and lift, taking up some of the extension of the rear shock absorber.
4. Pull the interior carpet down in the front corners, exposing the bolts on the tops of the shock absorbers. Remove the nuts on the top of the shock absorbers by turning them counterclockwise, with the 13 mm or 14 mm socket.
5. Verify the correct size of the bolt and nut on the bottom of the shock absorber (17 mm and 19 mm) and remove them, turning the counterclockwise. Lower the rear axle member carefully, until the upper portion of the shock absorber clears the mounting hole. Lift the shock out of the lower bracket.
6. Insert the bottom of the shock into the bottom shock mount. Insert the bolt and start the nut on the bottom bracket. Prior to inserting the upper portion of the shock, you will need to place the bushing and retainer over the shock rod.
7. Lift the rear axle member as you guide the shock rod into the upper mounting hole. Place the bushing and retainer over the shock rod and start the retention nut. Tighten the lower mounting bolts to approximately 40 to 50 foot-pounds of torque.
8. Remove the jack from the back of the car and push it under the side. Lift the car off the jack stand, remove it and lower the car to the ground.
9. Tighten the upper shock nut to 40 to 50 foot-pounds. If present, run the lock nut down and torque it to 40 to 50 foot-pounds also.
10. Repeat this process on the other side. Replace the trunk interior carpet when the job is complete.
Remove and Replace Front MacPherson Struts
11. Place the wheel chocks in front and behind one of the rear wheels. Loosen the front lug nuts with the lug wrench until they are finger tight. Place the jack under the front frame cross-member and lift the front end up until the front wheels clear the ground. Pull the jack out. Open the hood.
12. Place the jack stands under the front cross-member to each side of the jack pad and carefully lower the car onto them. Remove the lug nuts and front wheels and set the wheels aside.
13. Verify the size of the three or four bolts on the strut cap and remove them by turning them counterclockwise. Do this on both driver and passenger sides.
14. Verify the proper size wrench and socket for the two bottom strut bolts and remove them by turning them counterclockwise.
15. Grasp the strut firmly and pull down and push inward to release it from the shock tower and bottom clamp. Set the strut aside.
16. Repeat the preceding process on the other side.
17. Place the strut spring clamp on the uppermost and lowermost spring coils. Using the correct size wrench, collapse the spring as much as you can.
18. Verify the size of the upper strut nut and remove it by turning it counterclockwise. You may need to use the 13 mm wrench to hold the strut rod from turning
19. Lift the strut cap off the strut coil assembly and pull the strut out of the coil.
20. Insert the new strut through the coil and place the strut cap over the top. Secure the cap to the strut using the provided upper strut nut. Again, you may need to use the 13 mm wrench to provide enough torque to properly secure the strut cap to the strut.
21. Place the strut under the fender and lift it into place, lining up the holes on the strut tower with the studs on the strut cap. Place the three or four nuts that hold the strut cap to the tower on the strut cap studs and run them down clockwise to finger tight. You will need to hold the strut in place until the nuts are installed.
22. Twist the strut to line it up with the lower mount on the steering knuckle and insert the two bolts into their holes. If one of the large washers has the hole off-center, be sure to replace it exactly as it came out, as this adjusts the alignment camber angle.
23. Torque the bottom strut nut to 50 to 60 foot-pounds of torque. Torque the strut tower nuts to 40 foot-pounds. Replace the wheel. Install the lug nuts finger tight.
24. Repeat the preceding process on the other side. Place the jack under the front cross-member and lift the car off the jack stands. Remove the jack stands and lower the vehicle until the wheels make contact with the ground. Torque the lug nuts to 75 to 80 foot-pounds.
How to Play a DVD in a 2004 Mercedes
1. Insert the DVD to play into the slot on the dashboard DVD player and navigation system. Wait for the DVD menu to appear on the screen.
2. Follow the prompts and choose whether you wish the DVD to be played on the right-hand rear passenger screen, the left-hand rear passenger screen or both. Touch the selection on the screen until the one you prefer is highlighted, then remove your finger from the screen.
3. Choose to allow the passengers touch-screen controls so they can work the player from their screens. Touch that option on the dashboard touch-screen to highlight it.
4. Press Play when the DVD menu appears.
5. Adjust the volume settings for minimum and maximum on the dashboard touch-screen panel. This sets a volume range so the passengers in back can adjust the volume without it becoming too loud for you.
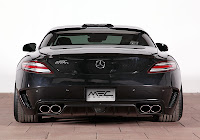
MEC Design Mercedes SLS 63 AMG

MEC Design finally released pictures of their unique kit for Mercedes SLS.
First is the addition of a new body kit consisting of a new front and rear bumper, front lip with optional carbon fiber in one or two pieces, side skirts with LED lighting, rear spoiler, roof scoop, and a rear diffuser.
Inside, designers added carbon fiber trim, an Alcantara sports steering wheel and special floor mats with the MEC logo.
As for the wheels you get MEC’s mecxtreme3 size 10,5×20 with 265/30 ZR 20 tires at front and 11,5×21 with 295/25 ZR 21 at the back. The car is also fitted with Hydraulic Suspension with “LIFT-UP” System that can raise the car by 30mm. The height adjustment capability can also lower the car by as much as 70mm.




Press Release
MEC Design Mercedes SLS AMG
MEC Design Bodykit consists of:
- Front Bumper with choice of 1 or 2 piece Front Lip Spoiler/ optional LED Lighting (Front lips are also available in Carbon finish)
- Rear Bumper with 3 different Diffusor options / "Extreme" or "Formula" or "GT3" (Diffusors are also available in Carbon finish)
- Side skirts, optional with 4 LEDs per side
- Rear Trunklid Spoiler (also available in Carbon finish)
- 2 Piece Window Spoiler (also available in Carbon finish)
- Roof Airscoop (also available in Carbon finish)
MEC Design Stainless Steel Sports Rear Muffler with a gigantic, very vigorous and muffled sound, especially in the higher rpm range, where the AMG system reaches its limits (in respect to the sound!); it can also be used with the original AMG System with Adaptor pipes for the MEC Design 4-pipes end tips for use with the MEC Design Bodykit!
MEC Design Hydraulic Suspension with "LIFT-UP" System, Height adjustment by pressing a button to 30mm at the front / rear axle and, lowering up to 70mm possible.
MEC Design Wheels mecxtreme3 Front axle 10,5x20 with 265/30 ZR 20 as well as rear axle 11,5x21 with 295/25 ZR 21; there is a possible combination of 11 or rather. 11,5x20 on the front combined with 12,5x20 on the rear axle
MEC Design Carbon/ Alcantara Sports Steering Wheel, the steering wheel is very strong and highly ergonomic in form; Furthermore the shift paddles and the steering wheel insert (triangle below) are also available in Carbon finish.
The steering wheel is also available with Leather/Alcantara or rather Carbon/ Leather finish.
MEC Design Complete Carbon Interior consits of Middle Console, Door guards, Scuffplate/entry guard, compartment between the rear seats, seat cover, seat casing.
MEC Design Floor mats with double stitched Nubuck Leather edging.
MEC Design Trunk finishing: complete trunk interior including trunklid in Alcantara with double stitched edging and logo.
Grill Inset painted in car colour.
Wednesday, May 1, 2013
2011 Mercedes C Class facelift

Mercedes may have taken a light hand with the exterior design of the facelifted 2011 C-Class, but under the skin some big changes await. According to Auto Motor und Sport, all updated C-Classes will have stop-start-equipped direct-injection engines, as well as the option of upgrading to all ten of the latest driver-assistance systems from the CLS, E-Class and CL.
The styling tweaks at the back are less noticeable, but it comes with a new bumper and LED taillights. The side mirrors are also new, reminiscent to that of Mercedes’ sporty models. Mercedes says the new shape body is more aerodynamic efficient than the old model.
Under the hood, three engines will be available in the United States. The big news is the addition of a turbocharged 1.8-liter four-cylinder with 201 hp (204 PS / 150kW) and 229 lb-ft (310 Nm) of torque. It enables the sedan to accelerate from 0-60 mpg in 7.1 seconds and return a combined 24 mpg. Alternatively, the C350 adopts the new 3.5-liter V6 which churns out 302 hp (225 kW / 306 PS) and 273 lb-ft (370 Nm) of torque.
Mercedes-Benz claims to have mainly worked on the surface structure of the dashboard trim and controls. The C-class stores, according to the German mark a bridge to the CLS, including through the multifunction steering wheel in that car that debuted (standard on the Avantgarde version).


Press Release
New look for Mercedes top-selling sedan this summer
The restyled MY2012 C-Class
- Energetic - new dynamic look inside and out
- Expanded - five new assistance systems for greater safety
- Efficient - new direct-injection engines with better fuel economy
- Experience - new-generation telematics
- Exceptional - more than one million sold since March 2007
The restyled 2012 C-Class sedan is scheduled to arrive in the U.S. in the summer of 2011. The front and rear end of the popular Mercedes sedan have been enhanced with a more distinctive design. The luxurious interior is now emphasized by the stylish new dashboard, which features a premium, fine-grain finish and stylish trim elements, as well as a high-resolution color display in the instrument cluster. Fuel economy has been improved by as much as 15 percent, thanks to new direct-injection engines and the redesigned 7-speed automatic transmission. Five new driver assistance systems ranging from the ATTENTION ASSIST drowsiness detection system through to the Blind Spot Assist are now available in the C-Class lineup. New generation telematics offer new infotainment and navigation features.
"In terms of driveline and safety systems, the new-generation C-Class offers the comfort and safety of our luxury vehicles - and with many high-end details in the interior evocative of the new CLS, the new C-Class sets completely new benchmarks in its segment when it comes to premium look-and-feel," says Dr. Joachim Schmidt, Executive Vice President Sales & Marketing Mercedes-Benz Cars. This interior upgrade is further enhanced by the latest generation of telematics, which not only features completely new visuals, but also brings improved functionality.
A total of more than 2,000 new parts distinguish the newest generation of the Mercedes-Benz C-Class from its predecessor. The U.S. market introduction is scheduled for summer 2011 (available to order in Europe as of January 2011). Alongside the generous standard equipment, the Sport and Luxury versions of the new C-Class form the basis of the individualization program, with both lines now more clearly differentiated from each other.
The C-Class is Mercedes-Benzs highest volume model range, and therefore especially important. The current range has chalked up global sales of more than one million units since its launch in March 2007. Since the market introduction of the first C-Class in 1982 (known then as the 190), Mercedes-Benz has sold more than 8.5 million vehicles around the world.
Dynamic, determined and confident exterior
The bumper now has a more distinctive and dynamic design, with the front end adopting the brands new design language. The central element of the front end is the grille, which is further enhanced by the new bumper design. The center air intake opens upward in a v-shape and forms the core element of the grille design. Distinctive lines emerge from the base of the aggressive arrow design in the center. Running beneath the headlamps, these character lines transition into the side profile. The outboard air intakes in the bumper are positioned very low down to give the car a more muscular stance.
The C-Class features a new aluminum hood, which contributes to weight reduction and consequently to improved fuel efficiency. Contours around the headlamps and grille bring additional emphasis to the front-end arrow form. Working together with the redesigned headlamps, the overall front-end look is far more distinctive.
Modified clear glass headlamps create a more dynamic and determined look and, together with the hood, grille and bumper enhance the arrow visual at the front end. This precise, contemporary look is reinforced by the design of both the exterior and interior of the headlamp units, which feature a finely balanced interplay between matte and gloss surfaces. The halogen headlamps follow the classic format with low beam located on the outside and high beam in the inside, while the indicator lamps are discreetly positioned in the outer corners toward the fenders.
The available bi-xenon headlamps come with active functions and bring added depth to the appearance with a series of LED modules. A C-shaped positioning light defines the nighttime design, with cornering lights located behind it and stretching outward to the main lamp module. At the base of the headlamps are broad horizontal LED indicator units. Also horizontal are the LED daytime running lights located in the bumper, which make the C-Class unmistakable from a distance.
On the rear bumper, the character lines and shutlines have been modified to add emphasis to the vehicles stance. This is especially evident in the steep rise of the character line running outward toward the rear lights. A continuous character line on the upper edge of the rear bumper runs into the fenders of the C-Class to provide a connection to the sides and emphasizes the sporty character of the rear view. A new one-piece jewel case on the tail lights provides further integration into the rear of the vehicle. The characteristic sinuous surface line is now reflected on the inside of the lights and is reminiscent of earlier models. The distinctive depth of the lights are achieved by LED indicators located in the center that appear to float in front of the more deeply set red LED bands above and below. The rear light pattern is particularly distinctive at night.
The bodyshell of the new C-Class is distinguished by its outstanding aerodynamics. With a cd figure of 0.26, not only is it best-in-class, its drag plane of cd x A = 0.57 m2 also cuts more smoothly through the air than most compact and even sub-compact cars.
Premium and sporty interior
One focal point of the work done in the interior was the redesign of the dashboard with the aim of creating a powerful, sporty and premium look-and-feel that includes extensive enhancement to the trim. The surfaces of the controls are more finely detailed and feature a metallic finish. The stepped hood of the instrument binnacle now extends to incorporate the central display and runs onward into the passenger side enhanced by a subtle character line. The central, trapezoidal air vents and the outer circular vents are accentuated with metallic trim elements. Central to the design of the new dashboard is a prominent trim panel. This element stretches from the central air vents along the passenger side to the outer air vent, adding visual width to the interior. The surface grain on the top portion of the dashboard continues along the upper edges of the door panels.
The new-generation center console is distinguished by its rectangular silver keys and emphasizes the premium feel of the interior in combination with matte keys, high-gloss surfaces and a new knurled control knob. Together with the new generation telematics, the restyled C-Class also receives a new instrument binnacle with integrated display. Oriented toward the driver are three tubular gauge surrounds with metallic surfaces that further enhance the aggressive character of the C-Class.
The luxury feel is emphasized by the new-generation leather steering wheel introduced with the all-new CLS and now available as standard in the C-Class. The steering wheel features a chrome-plated central spoke and further accentuates the cars stylish and sporty ambience.
The new C250 Sport and C300 4MATIC Sport models come with standard brushed aluminum trim, while the C350 Sport has distinctive Black Ash. The Luxury versions feature Burl Walnut trim.
Drivelines with more power and better fuel economy
Fuel economy has been improved by up to 15 percent. All new direct-injection versions feature exceptional efficiency and environmentally-friendly fuel consumption. All models also come with the redesigned seven-speed automatic transmission, with the gear ratios on all versions optimized for fuel economy.
The highlight in the engine lineup is the introduction of the new V6 gasoline engine in the C350 Sport Sedan, featuring the innovative and highly efficient BlueDIRECT process. The improvement in efficiency is combined with a considerable increase in output. The C350 Sport Sedan now generates 302 hp and 273 lb-ft of torque (previously 268 hp and 258 lb-ft), while fuel economy has been improved by 5 percent compared with the outgoing C350 model.
The four-cylinder engine (new for the U.S. market) features direct injection and turbocharging and is also distinguished by outstanding combined fuel economy of 24 mpg. This marks an improvement of nearly 15 percent compared with the 2011MY C300.
New driver assistance systems
The C-Class attains an all-new level of safety with a total of five new driver assistance systems ranging from ATTENTION ASSIST drowsiness detection through to Blind Spot Assist. The assistance systems are based on state-of-the-art radar, camera and sensor technology and are setup to react to frequent causes of accidents such as proximity to the vehicle in front, fatigue and darkness.
The following provides an overview of the new assistance systems:
- ATTENTION ASSIST
- Adaptive Highbeam Assist
- Park Assist incl. PARKTRONIC
- Lane Keeping Assist
- Blind Spot Assist
More user friendly, improved connectivity - the new generation of telematics
The new C-Class sees the debut of a new generation of telematics, which is scheduled for successive introduction across further model ranges. Key new features include improved user-friendliness with larger 3-D displays, phone book transfer, text message display, wireless music via Bluetooth and a USB interface now located in the center armrest.
How to Replace an Alternator in an S420 Mercedes
1. Disconnect the cable running to the negative battery terminal. Loosen the nut on the cable clamp running to the negative battery terminal with a socket wrench and slide the clamp off the terminal.
2. Open the hood and look straight at the front of the engine. You will see a belt that snakes through a system of pulleys. This is the the serpentine belt, also called a drive belt. It needs to be removed in order to remove the alternator. Draw a diagram of the belt path and orientation. You will need this diagram when reinstalling the belt.
3. Remove tension on the drive belt with a socket wrench and a 14mm socket. The tensioner is on the drivers side of the engine, near the front of the engine. The tensioner bolt protrudes out of the engines pulley system at a 45 degree angle, with a little bit of a hex shape at the top of the bolt and a small hole in the middle of the bolt. Turn the bolt counterclockwise to remove tension on the belt.
4. Pull the belt off the pulley system.
5. Remove the electrical connector running to the alternator.
6. Remove the alternator. Remove the upper and lower alternator mounting bolts. The alternator is mounted on the front of the engine.
7. Install the new alternator. Installation is the reverse of removal. Make sure that you orient the drive belt properly when installing it.
8. Attempt to start the engine. As long as the battery was not drained entirely when the alternator failed, you should be able to start the engine. If the battery is dead, you may need to install a new battery. To do this, remove the cable clamps on the battery terminals following the procedure in Step 1. This time, youll be removing both the positive and negative cables. Always remove the negative cable first and attach it last. Once the cable clamps have been removed from the terminal, remove the battery from the battery holder and drop in a new battery. Then, reconnect the battery terminals and tighten the cable clamps.
9. Check to make sure that the battery light does not stay on once the Mercedes is running.
How to Replace a Mercedes 039 Side
1. Remove the screws holding the front frame over the front of the mirror glass housing using a screwdriver. Set the screws aside. Carefully pull the mirror frame away from the rest of the mirror housing.
2. Put on thick work gloves to protect your fingers. Remove any broken shards of mirror, and throw them away.
3. Heat the surface of the glass with a heat gun to loosen the glue holding the remainder of the mirror in place. Pry the glass away from the mirror housing with a putty knife.
4. Apply adhesive remover to the adhesive still present in the mirror housing. Allow the adhesive to sit for about three minutes. This will eat away the remaining glue and make it easy to remove. Wipe the adhesive away with a soft cloth.
5. Apply a line of silicone adhesive to the mirror housing frame surrounding the interior of the mirror housing. Press the replacement glass inside the frame. Hold the glass against the frame with your hands.
6. Tape the mirror in place with electrical tape. Wrap the tape around the entire mirror housing several times for stability.
7. Replace the exterior frame over the mirror glass. Screw the frame into place. Leave the tape around the mirror housing for 24 hours while the glue dries completely. Remove the tape after 24 hours. If necessary, unscrew the top mirror frame to remove all tape pieces.
Tuesday, April 30, 2013
How to Tow With a Mercedes 240D
1. Calculate the trailers total mass by adding the cargos weight to the trailers gross mass (GTW). The trailers GTW will be located on a data plate riveted to the frame.
2. Determine if it is safe to tow the trailer by comparing the vehicles towing capacity to the weight of the trailer. The trailer weight should be lower than the vehicles capabilities.
3. Lower the trailers coupler onto the hitch ball and lock it in place with the latch. Secure the latch by pushing a hitch pin through the locking hole in the handle.
4. Fasten the trailers chain to the 240Ds hitch by crossing them under the coupler and hooking them on the hitchs chain connections.
5. Connect the trailers electrical coupler to the vehicles receiver. Test the lights prior to heading out on the road.
6. Double check all connections and make sure the vehicle and trailer are roadworthy.